Client Report Tokens
How to Use Tokens
The MainWP Client Reports extension uses three different types of tokens:- Client Tokens
- Section Tokens
- Data Tokens
Client Tokens
These tokens will allow you to display data you have set in the Child Site edit screen. For each child site, you should set the token values. After you set values, you will easily display data for the selected site in the report.Section Tokens
Section tokens require both opening and closing tags. They can easily be recognized by the starting part section. For example:[section.plugins.installed] – Opening Tag [/section.plugins.installed] – Closing TagSection token loops through the database and searches for the right data.
Example 1. [section.plugins.installed][/section.plugins.installed] will search for all installed plugins.
Example 2. [section.themes.activated][/section.themes.activated] will search for all activated themes.
Example 3. [section.posts.created][/section.posts.created] will search for all created posts.
Data Tokens
Data tokens have only one tag. They have to be used inside section tokens and have to be added between an opening and closing tag of a section token.Example 1: If you would like to display all installed plugins you would use this token structure: [section.plugins.installed] [plugin.name] [/section.plugins.installed] Output will be displayed like this: Akismet Hello Dolly (Random plugin names are used in the example above) Example 2: if you use token structure like this [section.plugins.installed] [plugin.name] – [plugin.installed.date] [/section.plugins.installed] The output will be Akismet – 2014–05–30 15:43:11 Hello Dolly – 2014–05–29 12:41:12A special type of Data tokens is Counter Tokens. You will be able to recognize these tokens by the first word. They end with “.count”. For Example [plugin.installed.count] These tokens won’t work inside of the section tokens. You need to use them out of section tokens.
Example 1: [plugin.installed.count] – It will display the number of Installed Plugins
Example 2: [theme.activated.count] – It will display the number of Activated Themes
Example 3: [post.created.count] – It will display the number of Created Posts
Insert Tokens
In each report section (Header, Body, Footer), you are allowed to use tokens, which will be replaced by actual values in reports. Along with manually typing tokens in report content, the extension will enable you to insert tokens by clicking the wanted token from the list. There are two ways:Available Tokens List
Under the edit box in all report sections, you can find the list of available tokens. By clicking a token in the list, you will insert the token in the place where your cursor stands in the edit box. Available tokens are divided into groups. Each token group has been listed in the top part of the section, where you click group links and navigate through all available tokens.Tokens Menu
In the content editor box in each report section, you can find the Insert Tokens menu. Navigate through the submenu system and locate the token that you need. Once you find it, click it, and the token will appear in the place where your cursor stands in the editor box.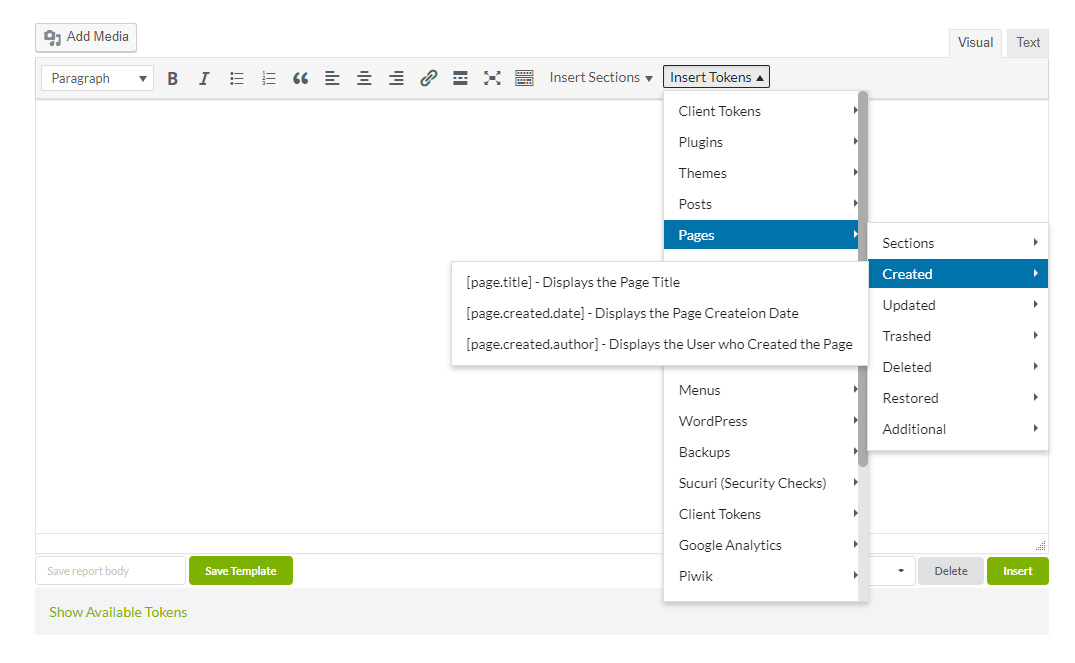
Insert Sections
Same as the Insert Tokens menu, the Insert Sections menu allows you to add preformatted token snippets in the report content. After inserting a section, you can edit it and add/remove wanted data tokens or add text strings.
For example,

By clicking Insert Sections > Posts > Deleted, the plugin will insert following token snippet:

[section.posts.deleted]([post.deleted.date], [post.deleted.time]) [post.title] by [post.deleted.author];[/section.posts.deleted]

Output will look like this:

(7-2-2017, 12:46) Demo Post Title 1 by Author;

(6-2-2017, 11:26) Demo Post Title 1 by Author;

(2-2-2017, 15:42) Demo Post Title 1 by Author;
Source Article:
https://kb.mainwp.com/docs/client-report-tokens/